"It's a boy!" my husband cried out. It was August 12, 2012, at 10:18 a.m. After 36 looong hours of labor, our "little t" had finally arrived. But wait just.one.second. What did the doctor say?! "Look again, Mr. Taylor." Oh.Em.Gee. IT'S A GIRL! A tiny, perfect (screaming) ball of pink joy! Oh boy -- were.we.surprised.
 |
| About 24 hours old, holding a rose from her Uncle Joey. And even smiling! |
When we found out we were pregnant, Matt and I decided that we weren't going to find out the baby's gender. Yeah, kinda old school of us, but it made the moment she was born that much more amazing and unforgettable. (I personally can't think of a better surprise in life.)
Both Matt and I were
convinced we were having a little dude. On paper, my pregnancy screamed boy. No morning sickness. Not too many crazy mood swings (until month 8, and then I certainly made up for lost time). My complexion even cleared up. And (almost) everyone said I looked like I was carrying a boy.
 |
| 26 weeks preggo. Probably on my way to get some ice cream. |
Deciding not to learn little t's gender absolutely had its pros and cons. One major pro -- it kept my shopaholic self in check. One major con -- not being able to complete the nursery in advance. But I had some ideas in mind for both a girl's and a boy's room. I actually had pretty much the entire girl's room completed in my mind. So after Sloan entered our lives, it was just too easy to choose a theme -- "You are my sunshine." Because she is. Duh.
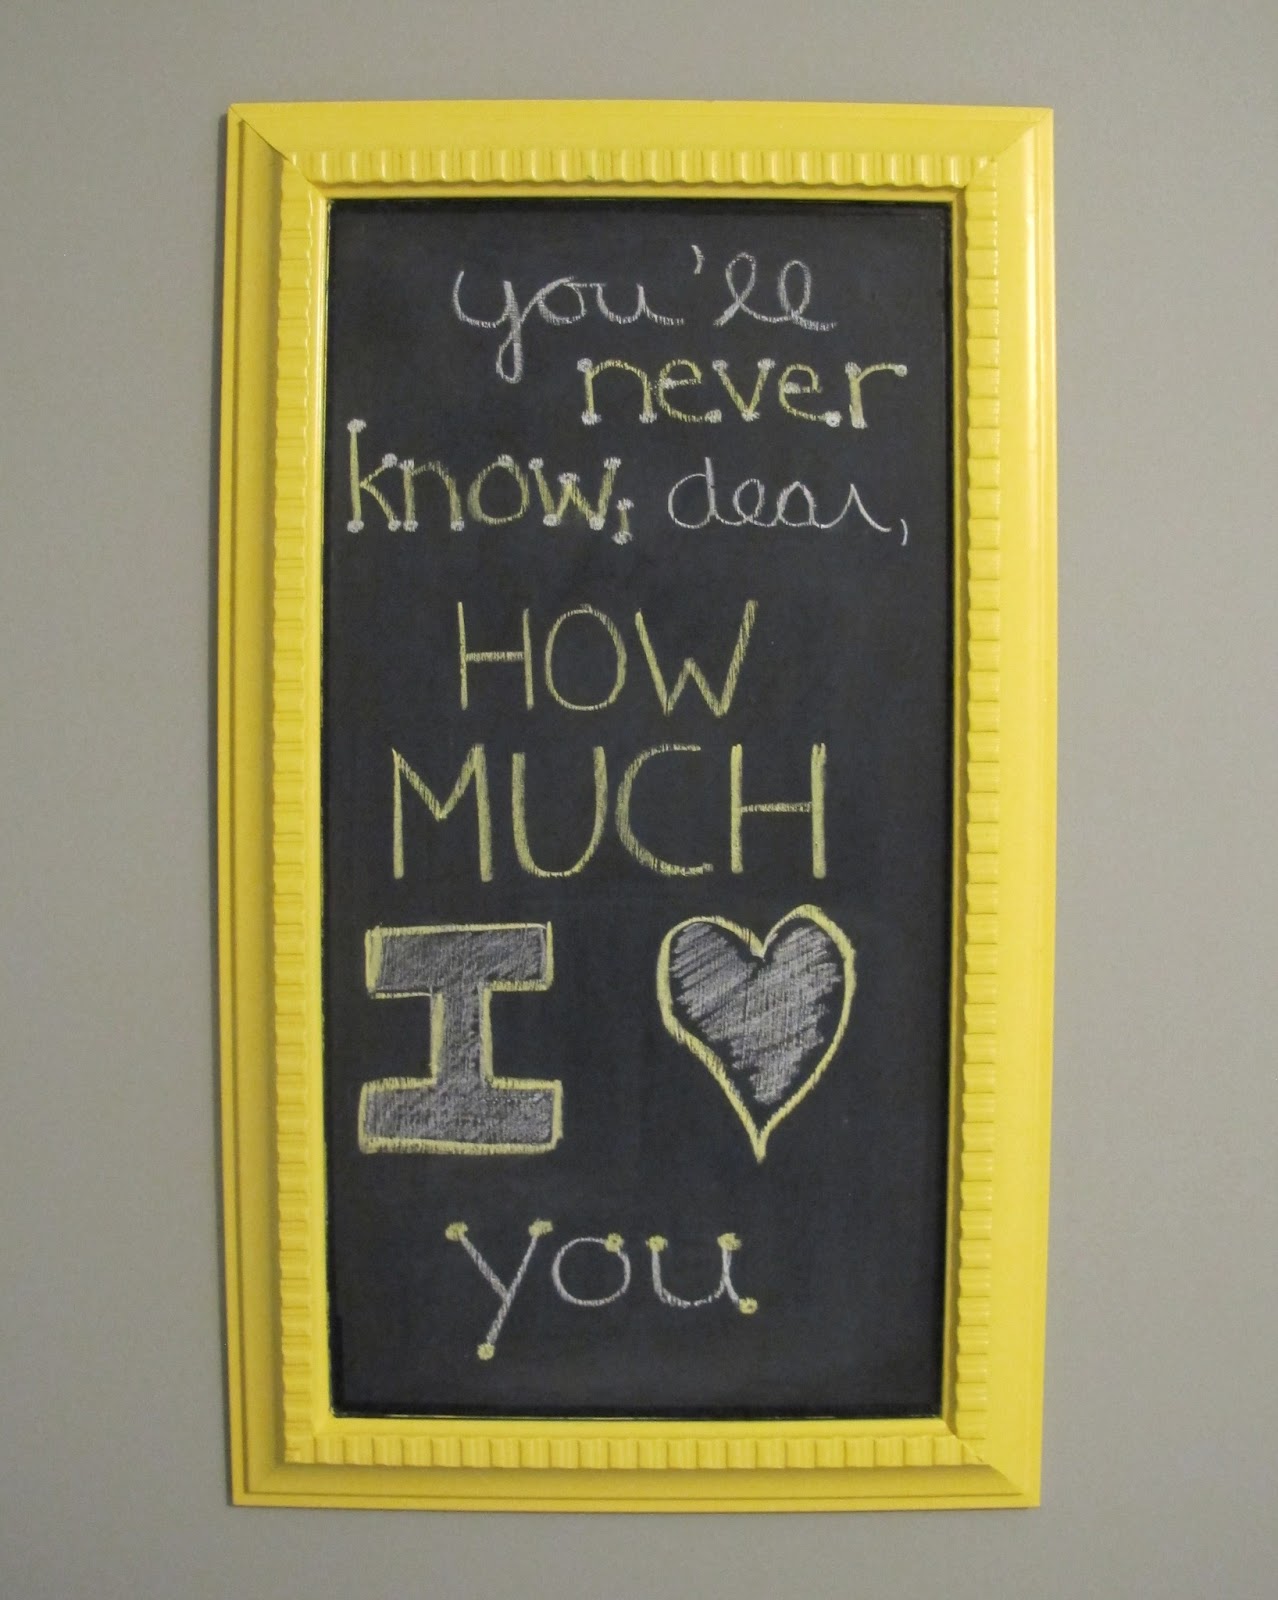
If you've seen the monthly pictures that I take of Sloan, you know that I have a
slight obsession with chalkboard paint. So I'm sure it will come as no surprise when I tell you that I made four chalkboards for her room.
 |
| I haven't done it yet, but eventually I'm going to change these to say things like: "Let the sun shine" -- "Here comes the sun" -- "Black hole sun" (kidding) |
I also converted an old painting into what I call her "name frame." Pretty easy and cheap to make, too:
- Get a big 'ol framed picture from Goodwill, a yard sale, etc.
- Deconstruct it
- Spray paint the frame yella
- Wrap the original glass and picture insert with fabric (held in place with spray adhesive, of course)
- Place the big fabric piece back into the frame (sealing the edges with duct tape, just for fun)
- Spray paint wooden letters yella
- Add white polka dots to the letters
- Use craft glue to glue the letters to the fabric-covered insert
- Done!
(And as easy as this was, it took me about two weeks to complete. Maybe longer. More about this issue
here.)
 |
| Love this bookshelf! This -- along with a mountain of books -- was a gift from Grandma and Grandpa Taylor. It's from one of my absolute favorite stores here in Atlanta -- Nadeau. If you haven't checked it out yet, GO. |
I keep saying that one of these days I'm going to learn how to sew. But, until then I'm just going to be extremely thankful that my mom knows how. She made curtains and a canopy for Sloan's room, and I'm thrilled with the way it all turned out -- thanks, Mom!
 |
| Crib skirt, sheet and pillow were made at Precious Cargo. For those of you reading in the metro Atlanta area, I highly recommend stopping by there if you ever need a baby gift! |
 |
| I also had a changing pad cover made in the same fabric as the crib sheet and pillow, but it happens to be in the dryer right now. Minor accident this morning, but thrilled to report that it washes up great! |
Another really easy (and ridiculously cheap) project for Sloan's room was her mobile. It's definitely not a traditional mobile -- because it doesn't really move. But these
tissue pom-poms are so light that they do bump around into each other when the ceiling fan is on. And they actually do grab Sloan's attention, which is great when it's time to lay her down for a nap. I can give them a little push and she will stare up at them as I quickly exit stage left.
 |
| The day I hung these up, Matt not only 1) noticed them, but 2) said he liked them. He even asked where I bought them! Imagine his surprise when I told him they were practically gratis. |
I also have to thank the talented Whitney Lee for making this birth announcement! I hadn't even considered making anything like this (not even with a chalkboard, if you can believe it), and was thrilled when Whitney offered -- it turned out awesome! I even had the perfect place to put it, since I didn't yet have anything to put on this shelf. Well, I suppose I could have put more bows and hats there. But, um, I think we have enough for now, don't you?
So even though I thought we were having a little boy, I'm pretty ecstatic that little t turned out to be a she. And I think her dad is, too.